Saturday, October 13, 2012

Cinnamon Roll Pumpkin Pancakes: A Yummy Disaster

When I saw these cinnamon roll pumpkin pancakes I had to try them.  They were so beautiful and looked so delicious.

After making them, I decided that Kevin at Closet Cooking must be a super culinary genius.  The perfect-looking pancakes on his blog are either the result of a thousand tries or mad talent.  Judging from the rest of Kevin's blog, I'm going to go with mad talent.

Because I wanted Steve to actually eat these pancakes, I used canned pumpkin instead of the delicata squash I had in the fridge (Steve has an aversion to all things squash, except canned pumpkin).  Canned pumpkin is usually in our village store in the fall.  It's also available at Wal-Mart in Anchorage when we do our annual shopping trip.


Pancake in Progress

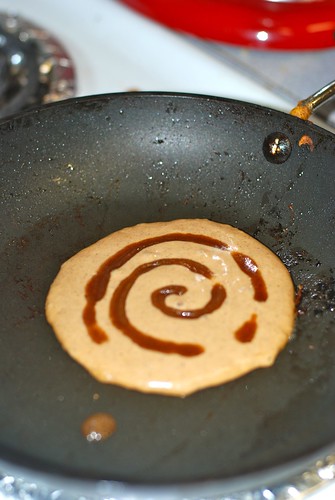
The pumpkin batter is topped with a cinnamon-sugary butter mixture.  Not looking too bad at this point, but...


Flipped pancake

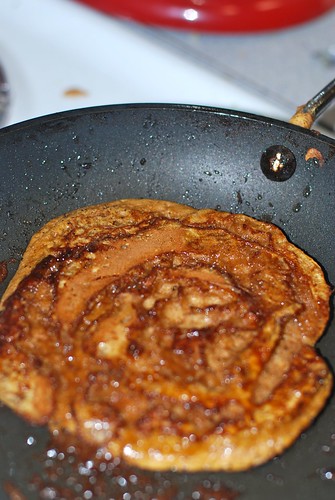
flipping is where the disaster part came in.  Steve is usually an excellent pancake flipper.  We're not sure what went wrong with these.  Steve called them roadkill pancakes.


Caramel Sauce

One victory of the meal was the caramel cream cheese frosting.  I used Kevin's caramel sauce recipe, and per his instructions, mixed it with some cream cheese.  The caramel sauce itself was so yummy that Steve was eating it out of the pan with a wooden spoon.  True story

We didn't bother drizzling the frosting over the pancakes in an artful manner because at this point, we weren't going for aesthetically pleasing.  We smeared the frosting on with a spoon.  And it was delicious that way.  Like eating pumpkin cake for breakfast.

Verdict: Delicious recipe worth making again, even if the final product isn't at beautiful as we'd hoped!

Thursday, February 23, 2012

Stuffed Pepper Casserole

Photobucket

These big beautiful peppers arrived from Full Circle Farm not too long ago. I put them to use by making this simple and tasty casserole. It all started with a stuffed peppers recipe I found somewhere> But it only took one attempt at pepper cleaning and stuffing until I realized they'd taste the same casserole style. I did a bit of modifying and came up with a method more conducive to my tolerance level.

Photobucket

My pepper cutting trick: hold the pepper by the stem, cut straight down, make a quarter turn, slice, repeat. At the end you're left holding all the seeds and crud that is still attached to the stem. Toss that baby and you're pepper is ready to go.

Photobucket

Slice the pepper pieces into one inch wide strips and layer in a small baking pan. The white bits you see are pieces of fennel I had in the refrigerator. I don't normally include fennel in this dish but I was looking for a way to use this stuff up. I hate letting food go to waste so I just add in random ingredients here and there.

Photobucket

In a separate bowl mix together the browned burger, rice, tomato sauce and seasonings. Then spread on top of the peppers. Cook in the oven for about 45 minutes.

Photobucket


When there's about 5 minutes left on the cooking time, sprinkle a generous amount of cheese over the whole mess and return to the oven.

Photobucket

Stuffed Pepper Casserole

Ingredients:
1 lb ground meat
1/2 c. uncooked rice
3 or 4 red bell peppers
14 oz can of tomato sauce
1 Tbs Worcestershire sauce
1/4 tsp. garlic salt
1/4 tsp. onion powder
pepper
1 tsp Italian seasoning
1 cup or more grated cheese

Directions: Preheat oven to 350 degrees F.
Brown the meat and cook the rice. In a bowl, mix together the meat, rice, tomato sauce, Worcestershire sauce, garlic salt, onion powder, and pepper.
Slice the peppers into 1 to 2 inch strips. Arrange peppers in a small baking dish (7in X 11in or so).
Layer the meat mixture over the peppers.
Bake for 45 minutes to an hour depending on how soft or firm you prefer your peppers. If the top starts to get over done, cover with aluminum foil. When there is about 5 minutes cooking time left, remove the foil and cover with shredded cheese. Return to oven until cheese has melted.

~AnnMarie

Saturday, February 4, 2012

BBQ Sauce or The Recipe my Brother Stole

Photobucket

Many years ago my brother was a cook at a local restaurant known for their excellent BBQ ribs. He made their "secret" sauce so many times he had the general recipe memorized. The restaurant went out of business not long after he worked there so I think it's now safe to share.

Photobucket

Here's the ingredients needed to make the magic. For the oregano, I like to use both leaves and the ground up stuff.

PhotobucketPhotobucket

Use this recipe as a starting point. Mix the ingredients and then take a taste. Add more spices, liquid smoke & vinegar as needed. I almost double the amount of liquid smoke, oregano & cayenne. I know it's perfect when I take a taste test and can't resist the urge to have just one more and maybe just one more.

Stolen BBQ Sauce Recipe 
Ingredients:
1 c. ketchup
1/3 c. brown sugar
1/4 tsp. liquid smoke
1/4 tsp. oregano
2 T. vinegar
1/4 tsp. cayenne pepper
black pepper

Directions:
Mix all ingredients.
Add and subtract to your liking.

~AnnMarie

Monday, January 30, 2012

Crazy Chocolate Cake

Despite the manager's best efforts, on occasion the local store is sold out of eggs and waiting for their next shipment to arrive. There are a few solutions to this problem when it comes to keeping up with dessert cravings.

1) Special order eggs from Nome and have them delivered by plane (for a price of course)
2) Use powdered eggs (the success rate for this is hit or miss)
or
3) Collect recipes that don't require eggs (bingo)

Photobucket

This perfectly moist and delicious chocolate cake magically doesn't require eggs. It's like the anti-recipe to my eggnog post the other day.

Photobucket

Go ahead and mix it by hand right in the pan. Crazy huh?

Photobucket

After mixing the dry ingredients make three holes in the mixture. The holes will be the temporary home for the vanilla, oil and vinegar. Pour water over the entire pan and mix again. I find a fork works best.

Side Note: This preparation method is also handy if you don't have a working mixer because the one you got for a wedding gift 8 years ago decided to give up the ghost and you can't afford to replace it at the moment. *sigh*

Photobucket

It's optional but you can also throw a handful of chocolate chips on top, you'd be crazy not to.

Crazy Chocolate Cake

Ingredients:
3 c. flour
2 c. sugar
1/3 c. cocoa
2 tsp. baking soda
1 tsp. salt
1 tsp. vanilla
2 T. vinegar
3/4 c. cooking oil
2 c. water

Directions: Mix the dry ingredients directly in the cake pan. Make three holes in the mixture for vanilla, vinegar and cooking oil. Pour water over the whole mess and stir with a fork until it's well mixed. Sprinkle a handful of chocolate chips on top if you'd like. Bake at 350 degrees for 35 - 40 minutes until a toothpick comes out clean.

~AnnMarie

Saturday, January 28, 2012

Homemade Eggnog: Possible and Delicious

This is one of my favorite recipes to share at holiday gatherings and special parties. You may or may not be a fan of the eggnog that shows up in grocery stores at Christmas time but love or hate it this is something completely different. I happen to dislike store bought eggnog very much. This, however, tastes light and rich and just plain amazing.

Photobucket

The ingredients are few: eggs, milk, sugar, salt, nutmeg, vanilla and cream.

Photobucket

Whisk together the eggs, salt and sugar.

Photobucket

Stir in one quart of milk.

Photobucket

Heat over low heat until the temperature reaches 160 - 170 degrees. Stir constantly or you will have bits of cooked egg in your nog and that's just plain weird. I have saved it from egg chunks by using my immersion blender to reincorporate the separated egg.

Photobucket

Place in an ice water bath (or snow bath if you live in a place that has piles of snow right outside the front door).

Photobucket

Stir in another quart of milk, nutmeg and vanilla.

Photobucket

The proper thing to do now is to take some heavy whipping cream and whip it until soft peaks form. Us poor bush dwelling folks don't have access to heavy whipping cream unless we special order it. So, our emergency substitution for real whipping cream is Dream Whip. It virtually has an endless shelf life. I recommend buying this for your backup Armageddon supplies. That way if the world around you is crumbling you can still have nice desserts.

Photobucket

I normally put the eggnog a punch bowl, top with the whipped cream and sprinkle nutmeg on top for a pretty effect. For this photo my coffee mug will have to do.

I promise you, even the most skeptical party goer will be crazy for this if you can get them to take just one sip.

Homemade Eggnog

Ingredients:
1 dozen eggs
1 1/2 c. sugar
1/2 tsp salt
2 quarts milk (divided)
2 T vanilla
1tsp nutmeg
2 c. heavy whipping cream
Pretty punch bowl  

Directions: In a heavy 4-quart saucepan, whisk together eggs, sugar & salt. Add 1 quart of the milk. Cook and stir over low heat until 160 - 170 degrees. Stir in vanilla, nutmeg and remaining milk. Cool in an ice water bath. If the mixture separates mix it in the blender. It'll fix things right up. Cover and refrigerate for 3 hours or more. When ready to serve, beat cream until soft peaks form. Whisk gently into cooled milk. Pour in to a chilled punch bowl. Sprinkle with nutmeg. 

~AnnMarie

Wednesday, January 25, 2012

Play Dough: For Birthday Gift Emergencies

One challenge of living in a remote location is being creative with last minute birthday party invitations. Getting a call to attend a child's birthday party may happen just a few hours (or minutes) before it begins. No one expects you to take a gift but since giving gifts is fun I try to find something to give the birthday kid.

Swinging by a big box store on the way to the party is just not an option so I'm forced to find other solutions. I am not one bit shy about re-gifting gently used toys or books from my son's toy box. However, if you're not into that sort of thing, a great second option is homemade play dough. Play dough can be made in a matter of minutes with just a few simple ingredients.

Photobucket

All you need is flour, salt, cream of tartar (which I have a lifetime supply of for some reason),

Photobucket

oil, water,

Photobucket

and food coloring.

Photobucket

Combine flour, salt and cream of tartar in a saucepan.
Pour the colored liquid into the prepared mixture.

Photobucket

I decided I wanted a brighter color so I added more food coloring.

Photobucket

Heat over medium heat and stir, stir, stir until a ball forms. If you're a sissy like me you might need someone to take over the stirring job part way through to give your arm a rest.

Some people add yummy smelling extracts at this point to make the play doh experience even more enjoyable.

Photobucket  Photobucket

Let cool and knead until smooth.

I usually double the following recipe.


Homemade Play Dough
1 cup flour
1/2 cup salt
2 tsp. cream of tartar
1 cup water
1 Tbs. vegetable oil
food coloring
optional: vanilla, peppermint or almond extract

1) Combine flour, salt and cream of tartar in a saucean. In a bowl, put water, oil and food coloring. Gradually stir wet ingredients into the dry ones until mixture is smooth.

2) Cook over medium heat, stirring constantly until a ball forms. Remove from stove and cool.

3) Knead the play dough until smooth. Store in an airtight container or Ziplock bag: dough lasts up to four months.

~AnnMarie

Saturday, December 17, 2011

Grated Beets: A Pretty Side Dish for the Holidays


Red Beets
photo by FotoDawg on flickr


Start with some big beautiful beats.

Photobucket

Scrub the beats, drizzle with olive oil, season with salt and pepper and roast until nice and tender.

Photobucket

Once the beets have cooled, slip the skin off and grate them.

Photobucket

Add these magical ingredients to the shredded beets. I usually include more sour cream and vinegar than the recipe calls for. I just keep adding and tasting until it's perfect for my taste buds.

Photobucket


Grated Beets

Ingredients:
2 lbs medium beats, trimmed and scrubbed
1 T. olive oil
Coarse salt and freshly ground pepper
2 T. cider vinegar
1 T. sugar
1/4 c. sour cream 

Directions: Preheat oven to 375 deg. Drizzle beats with oil, season with salt and paper & wrap tightly in aluminum foil. Bake for about 1 hour until fork tender. Remove from oven: let cool. Peel, and grate on the large holes of a box grater into a large bowl. Drizzle with vinegar: sprinkle with sugar. Toss to combine. Fold in sour cream: serve.