Showing posts with label dessert. Show all posts

Monday, January 30, 2012

Crazy Chocolate Cake

Despite the manager's best efforts, on occasion the local store is sold out of eggs and waiting for their next shipment to arrive. There are a few solutions to this problem when it comes to keeping up with dessert cravings.

1) Special order eggs from Nome and have them delivered by plane (for a price of course)
2) Use powdered eggs (the success rate for this is hit or miss)
or
3) Collect recipes that don't require eggs (bingo)

Photobucket

This perfectly moist and delicious chocolate cake magically doesn't require eggs. It's like the anti-recipe to my eggnog post the other day.

Photobucket

Go ahead and mix it by hand right in the pan. Crazy huh?

Photobucket

After mixing the dry ingredients make three holes in the mixture. The holes will be the temporary home for the vanilla, oil and vinegar. Pour water over the entire pan and mix again. I find a fork works best.

Side Note: This preparation method is also handy if you don't have a working mixer because the one you got for a wedding gift 8 years ago decided to give up the ghost and you can't afford to replace it at the moment. *sigh*

Photobucket

It's optional but you can also throw a handful of chocolate chips on top, you'd be crazy not to.

Crazy Chocolate Cake

Ingredients:
3 c. flour
2 c. sugar
1/3 c. cocoa
2 tsp. baking soda
1 tsp. salt
1 tsp. vanilla
2 T. vinegar
3/4 c. cooking oil
2 c. water

Directions: Mix the dry ingredients directly in the cake pan. Make three holes in the mixture for vanilla, vinegar and cooking oil. Pour water over the whole mess and stir with a fork until it's well mixed. Sprinkle a handful of chocolate chips on top if you'd like. Bake at 350 degrees for 35 - 40 minutes until a toothpick comes out clean.

~AnnMarie

Saturday, December 10, 2011

Mint Brownies

Photobucket

I'm pretty sure one pan of these babies caused me to gain five pounds last Christmas. Nonetheless, I made them again this year and I think you should too.

Photobucket

Start with unsweetened chocolate baking squares.


Photobucket

Add the shortening

Photobucket

and melt them together.

Photobucket

Add sugar, eggs and vanilla.

Photobucket

No need to use a mixer for this recipe, just stir with a spoon.

Photobucket 

Stir in the dry ingredients.

Photobucket

The brownie base in this recipe is not very sweet. It's a nice contrast to the next layer which is an intense hit of sugary frosting.

Photobucket

Blend butter, cream and powdered sugar.

Photobucket

Add peppermint extract and a few drops of green food coloring for that festive touch.

Photobucket

Spread frosting over the cooled brownies and put the brownies in the refrigerator until the frosting hardens.

Photobucket

Now for the the third layer, the chocolate glaze: melt semi-sweet chocolate and butter and spread on top of the frosting.

Photobucket

A plateful of these beauties looks great for a holiday party or gathering. I like them best when they're nice and cool from being stored in the refrigerator.


Mint Brownies

Ingredients: Brownies:
4 squares unsweetened chocolate
2/3 c. shortening
1 tsp. vanilla
2 c. brown sugar
1 1/4 c. flour
3 eggs
1 tsp. baking powder
dash salt

Peppermint Frosting:
2 c. powdered sugar
2 T. cream
1/2 c. soft butter
3/4 tsp. peppermint extract
green food coloring

Glaze:
3 squares semi-sweet chocolate
3 T. butter

Directions: Brownies: Melt chocolate and shortening. Add sugar, eggs and vanilla. Blend well. Add dry ingredients. Bake in 9X13 pan at 350* for 25 min.

Frosting: Blend all ingredients well. Place on cooled bars. Refrigerate to harden slightly.

Glaze: Melt together and spread over cold frosting.

Wednesday, November 2, 2011

Mom's Pumpkin Pie

I'm crazy about pumpkin pie. I once ate an entire pie in one sitting at my grandma's house. She spoiled us as children and would let us get by with that sort of thing. Three cheers for grandmas I say!

ppie7

This one's another recipe from my mother. I have never had another pumpkin pie that even came close to being this good.

ppie4

Here's more of our cooked pumpkin frozen in two cup bags. We have this season's pumpkins waiting for their turn to be cooked and stocked up the freezer. In the mean time, I have a few more bags from last year that need to be used up. I have been making all my favorite pumpkin recipes and even found a new recipe that is so quick, so easy and so delicious, that it just may cause us to use up our supply in double time. I'll be sharing very soon.

ppie1

If the holidays came in a spice jar, it would contain all of the above.

ppie3

White sugar, brown sugar and the spices.

ppie5

Add evaporated milk and milk and eggs. My friend Charity found a recipe for pumpkin pie that did not have any evaporated milk. She said it was actually quite tasty. So, should you find yourself out of this ingredient one cold dark arctic night as you are craving a piece (or an entire) pumpkin pie, you now have a back up plan.

I use an immersion blender to mix the filling up. Mine is Kitchen Aide brand and I love it. I bought a cheaper version for our cabin in Minnesota and it's just not as sturdy. I'm a fan of blending directly in the bowl rather than transferring back and forth to a blender.

ppie6

Pour into a prepared pie crust (use half butter and half shortening in this crust recipe).

Bake until a knife comes out fairly clean from the center. I cover the edges in tin foil to avoid burning. I have to bake it much, much longer than the recipe calls for for some reason so covering the edge is what saves this pie from being ruined by a blackened crust.

ppie8

Good for dessert or breakfast in my opinion.


Mom's Pumpkin Pie

Ingredients:
2 c. cooked pumpkin
1/3 c. brown sugar
1/3 c. white sugar
1 tsp. cinnamon
1/2 tsp. ginger
1/4 tsp. nutmeg
1/4 tsp. cloves
1/2 tsp. salt
2 eggs
1 1/2 c. milk
1/2 c. evaporated milk

Directions: Preheat oven to 450 degrees. Mix all ingredients in a blender. Poor into prepared pie shell. Bake for 15 min. Lower temperature to 325 degrees for 45 minutes. Butter knife should come out (more or less) clean.

*The above cooking directions work for my mom, but for some reason my pie needs to cook for way more time. I cover the edge of the crust in tin foil to avoid burning the edges and bake at 450 degrees for 25 minutes. Then lower the temperature to 350 degrees and bake for about an hour.

~AnnMarie

Sunday, October 9, 2011

Blueberry Pie

bluepie7

My mom makes the best pies, hands down. She's always asked to bring her pies to holiday dinners with the extended family I plan to share a few of her recipes with you here over the next few weeks. I made a few changes to this recipe but her original recipe is written at the end of the post.

pie1


First, your favorite pie crust recipe. I use the Joy of Cooking's double crust pastry recipe and opt for half butter and half shortening. Use this recipe but substitute half the butter for shortening. It turns out perfectly flaky every time.


pie2

Split dough in half, wrap in plastic and refrigerate until filling is complete. Chilled dough is much easier to work with than a warm sticky mass.

pie4

Picking berries is a time consuming and tedious job in my opinion. I'm not the biggest fan of picking but I do love eating and cooking with berries so I muscle through. I found that when making a blueberry pie, if I use half of the amount of blueberries it calls for and substitute the rest with apple, I can stretch my blueberry supply even further. The apple flavor doesn't come out much at all so blueberry is still the prominent flavor.

pie3

First mix the flour, cornstarch, cinnamon, nutmeg, salt, lemon peel and sugar (again, tundra berries are super tart so I add extra sugar, maybe an extra 1/4 cup or so).

pie5

Then stir dry ingredients together with the berries and apple. I usually sprinkle on some tapioca over the top of the whole mess at this point. I don't like a pie that runs all over your plate so I add extra thickening agents.

pie12

Roll dough out on a piece of floured wax paper. We save and reuse the bags from cereal boxes, I never buy waxed paper. Being resourceful with what you already have is the best way to save money up here.

blpie1

Rolling on to a piece of wax paper also makes it very easy to transfer to the pie plate.

bluepie2


It peels right off. I have never been successful at pulling up a crust directly from the counter top.


bluepie3

Add a pretty crust design.

bluepie4

Cut vents in the top and sprinkle with cinnamon and sugar.

bluepie5

Pretty, inside and out.


My Mom's Blueberry Pie

Ingredients:

4 c. blueberries
1 c. sugar
3 T. flour
1 T. cornstarch
2 T. tapioca
1/2 tsp. lemon peel
1/4 tsp. cinnamon
1/4 tsp nutmeg
dash of salt

Directions:

Combine all of the ingredient. Place in bottom crust. Sprinkle with 1 tsp. lemon juice and 1 T. butter. Place second crust over the top and seal the edges. Cut slits in top crust for steam to escape.

~AnnMarie

Wednesday, September 21, 2011

Monkey Bread

I saw this monkey muffin recipe on The Pioneer Woman's blog the other day and was just about to give them a try when I remembered a monkey bread recipe I have been carting around for years. I originally got the recipe from Lyn Aro of Zim, Minnesota when I was about 15 or 16 years old. She would make it for the after church goodies and conversation in the church basement. I have many fond memories of looking forward to her Sundays for hosting so I could dig into this gooey goodness. She told me it was super easy to make, turns out she was right.

Speaking of Lyn, she was also the person who encouraged me to take a job at the local living history museum. This was the place where I eventually met my husband. I guess I owe quite a bit to this woman, a great recipe and a husband!

monkey3

I started with basic white dough made in the bread machine. Lyn's recipe calls for three cans of Pillsbury biscuits cut into quarters but it's not an item carried at our store.

monkey4

Pinch off small balls of dough. I probably should have made them about half this size but I didn't feel like "monkeying" around that much.

monkey5

Roll each ball in a cinnamon and sugar mixture.

monkey7

Place the cinnamon dough balls in a Bundt pan. If you have a silicone one like mine, there's no need to grease the pan. Otherwise, butter that baby well. My Minnesotan roots are coming out pretty strong here, church basements, Bundt pans, an excessive use of butter . . .

monkey2

Melt these two magical ingredients together in a sauce pan.

monkey1

Pour the caramel mixture over the top of the dough.
Bake at 350 for 35 to 40 minutes.

monkey8

Flip over and let the caramel drip down for a minute before removing the pan.

monkey9


It's surprisingly easy to eat with your hands, so dig right in. Monkey bread makes a great breakfast, snack, dessert or potluck dish.

Recipe can be found here.


~AnnMarie


Friday, September 2, 2011

My Favorite Way to Eat Berries

Alaska's Bounty

I was going to tell you that these berries were Alaskan blueberries, but then I did an internet search to make sure.  It turns out I've been misidentifying these berries for almost seven years.  According to this and this they are blackberries or crowberries.

At any rate, the above picture is of Alaskan berries.  They grow near Shishmaref and Brevig Mission.


DSC_0038

Frozen berries are best served in a little glass bowl...


DSC_0040

sprinkled with sugar...


DSC_0041

and covered with evaporated milk (my friend Ginger uses half and half, but I don't keep that around the house).


DSC_0042

The milk crystallizes around the frozen berries, and the sugar makes it just sweet enough.

Mmmmmmmm.  The bounty of Alaska.

Doughnuts Shishmaref Style


Last week I took a cooking lesson from one of my favoritest students.  She brought over her grandma's doughnut recipe, and we gave it a whirl.


DSC_0387.JPG

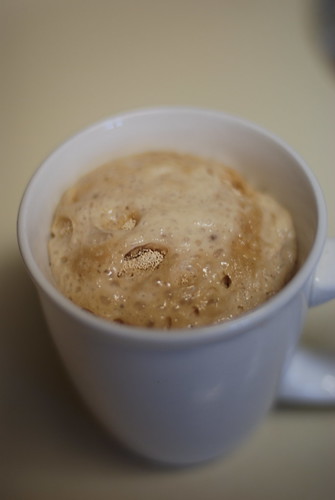
This is not a frothy heated beverage.  It is yeast and warm water.  It was the first step of the Shishmaref doughnuts.

DSC_0384.JPG

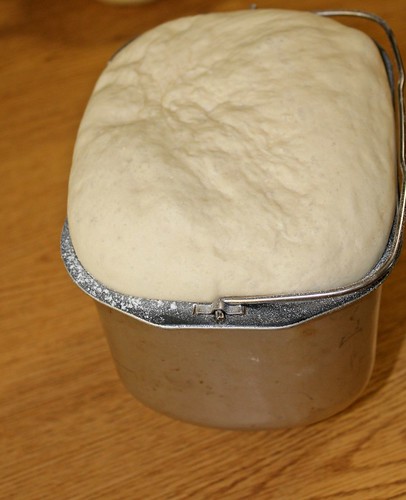
I was feeling pretty lazy, so I decided to try to mix the dough in the bread maker.  Our Kitchen Aid is still in Washington, and I really didn't want to stir everything by hand.


DSC_0385.JPG

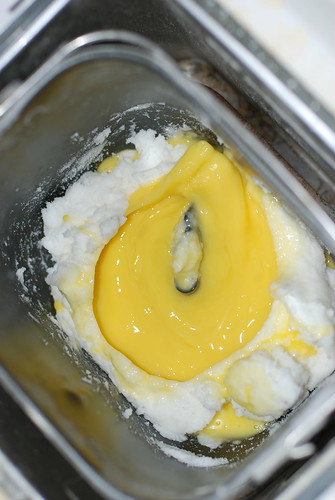
Things got a little un-okay when I added the eggs.  The bread maker created this little yellow vortex surrounded by a majority of the shortening and sugar.


DSC_0388.JPG

I used a little wooden spoon action (or maybe it was rubber spatula action) to scrape the sides, resulting in a more appropriate egg/shortening/sugar mixture.


DSC_0390.JPG

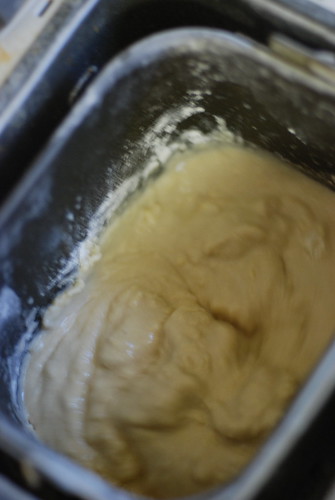
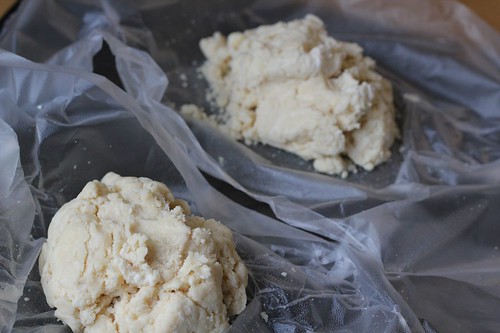
I added the flour...


DSC_0405.JPG

and let the dough rise for a few hours.


DSC_0418.JPG

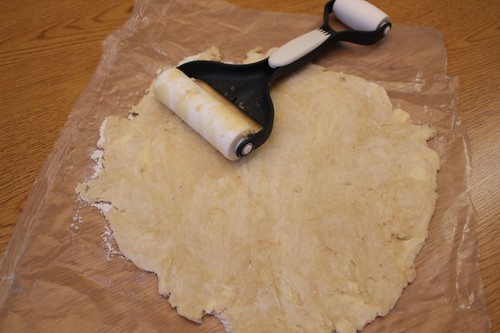
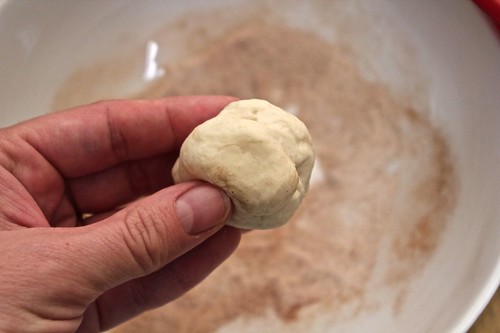
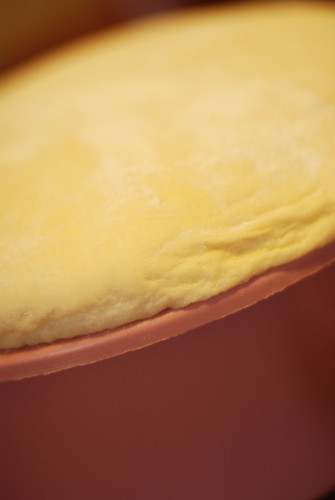
We rolled it out.  My cooking tutor rolled her dough thicker than the dough in the above picture.  I ended up  re-rolling mine in order to have more thickness.


DSC_0419.JPG

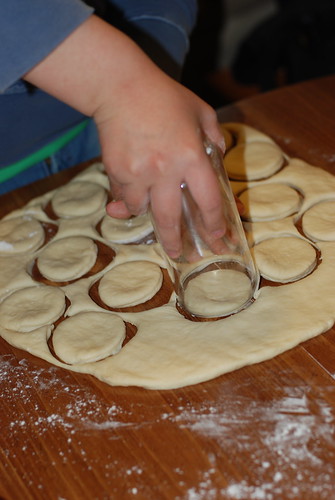
We used glasses to cut the dough into circles.  I was informed that my glasses are, in fact, too small to make proper doughnuts.


DSC_0422.JPG

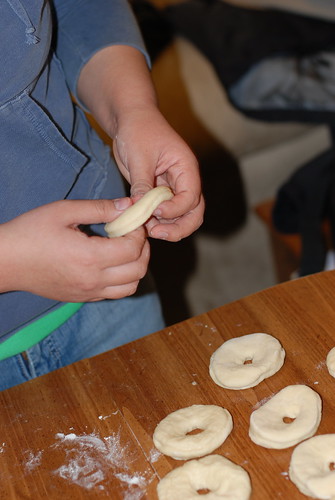
My cooking tutor showed me how she uses her fingers to make the doughnut holes.


DSC_0428.JPG

After letting the doughnuts rise for about forty-five minutes, we threw them in hot oil.  The above picture is of my pot of hot oil and doughnuts.


DSC_0432.JPG

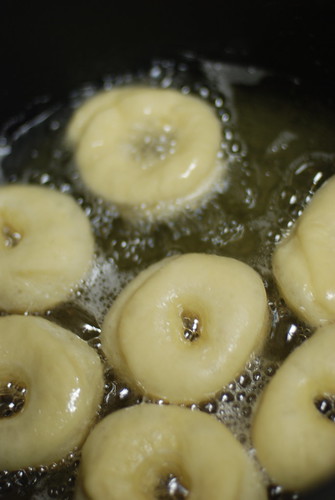
This pot belongs to my cooking tutor.  You'll notice that she has significantly more doughnuts than mine.  That's because she's a doughnut pro, and I'm a mere amateur.


DSC_0429.JPG

I was satisfied manning my four.  That way I could flip them over when they were golden.


DSC_0434.JPG


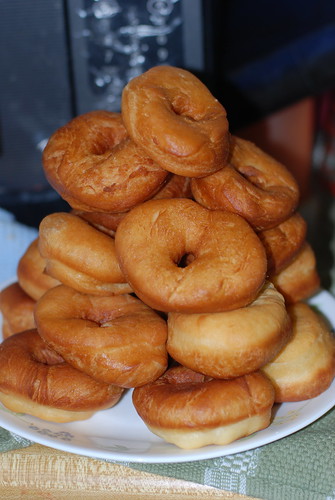
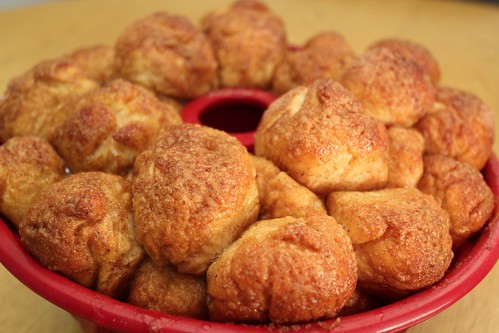
Our effort resulted in a pile of doughnuts.  This is just one of the piles.


DSC_0442.JPG

I added my own little twist to the Shishmaref dougnuts: toppings!  I've almost always seen doughnuts in Shishmaref served plain (like the one on the right).  We topped ours with powdered sugar (that was Steve's idea), maple frosting (the one on the upper left that looks like glaze), and chocolate fudge frosting (left over from some killer cake I made a while ago).

The verdict: two thumbs way up!!!  I had to give most of the doughnuts away so that we wouldn't eat them all...

Here's the recipe for Shishmaref Doughnuts:

3 packets of yeast
1 c warm water
2/3 c shortening
2/3 c sugar
2 tsp salt
3 eggs
1 c Milk
7 c flour

Mix the yeast with the warm water and set aside.  Mix the shortening with the sugar (using a bread maker is fine and especially labor saving).  Add the eggs, milk, and salt.  Mix.  Gradually add flour.  Mix.

Knead the dough (or let it go through a dough cycle in your bread maker).  Let the dough rise until doubled in size.

Roll out the dough.  Cut it into appropriate doughnut-sized circles.  Use your thumb to make doughnut holes.  Let the doughnuts rise until doubled in size.

Heat oil.  Put the doughnuts in the oil.  Flip when golden.  Take out of the oil and drain on paper towels.

Enjoy plain for an authentic Shishmaref experience.  Frost for a little flair.